Sunday, November 20, 2011

DIY Felt Bag of Donuts

I am so excited that about this little project I completed tonight. That's right I made 3 sets of this project in ONE evening! This is my first ever craft tutorial, so if I'm missing anything, please let me know!

You'll Need:


Paper bag, peeled apart to create large rectangle.
White or cream colored felt (I purchased half a yard and have enough for 2 more bags)
Assorted puff paint colors
Clothes pins
Iron and board
Scissors
Hot glue gun


First I got the idea for these cute little fabric donuts here.


They would be great gifts for my daughter's little friends for Christmas. But they needed something to go in, something that was soft and indestructible and safe for toddler play time. I looked at making felt donut boxes but I don't have a sewing machine nor the patience for one. As I was thinking of things that donuts are served on, it hit me. Paper bags! What if I made a paper bag out of felt? Ta-Da!


I am oh so excited about this because I figured out the pattern all by myself, no Pinterest needed! Here's what I did:

Cut out a patch of felt the same size as an unfolded paper bag. (I started cutting mine before I realized I could peel it apart, duh)

Trim up the edges to meet if needed.

Trim the top edge to look like a paper bag by cutting tiny triangles out.


Then fold one side into the middle and run hot glue down the side to create a seam.

Then fold over the side and press to seal.

Next fold in bottom corners just like wrapping a gift. Apply glue at edges to seal. (Beware of upper fold and make sure glue doesn't bleed or felt will stick where it shouldn't).


Fold the top flap up where your glue stop and make a crease for reference. Add glue around the edge, staying above the crease. Fold down at crease to seal.

Do same technique with next fold.

And now it stands up! (If your glue seeped onto inside fabric, gentle pull to loosen or try to cut away with scissors where needed.)


Now to crease your folds! Heat up your iron and grab the board. I used a medium setting on my iron, so as not to melt the hot glue already sealed. I also used clothes pins to hold the folds while I ironed. I tried not to iron over the glued seams as much as possible.


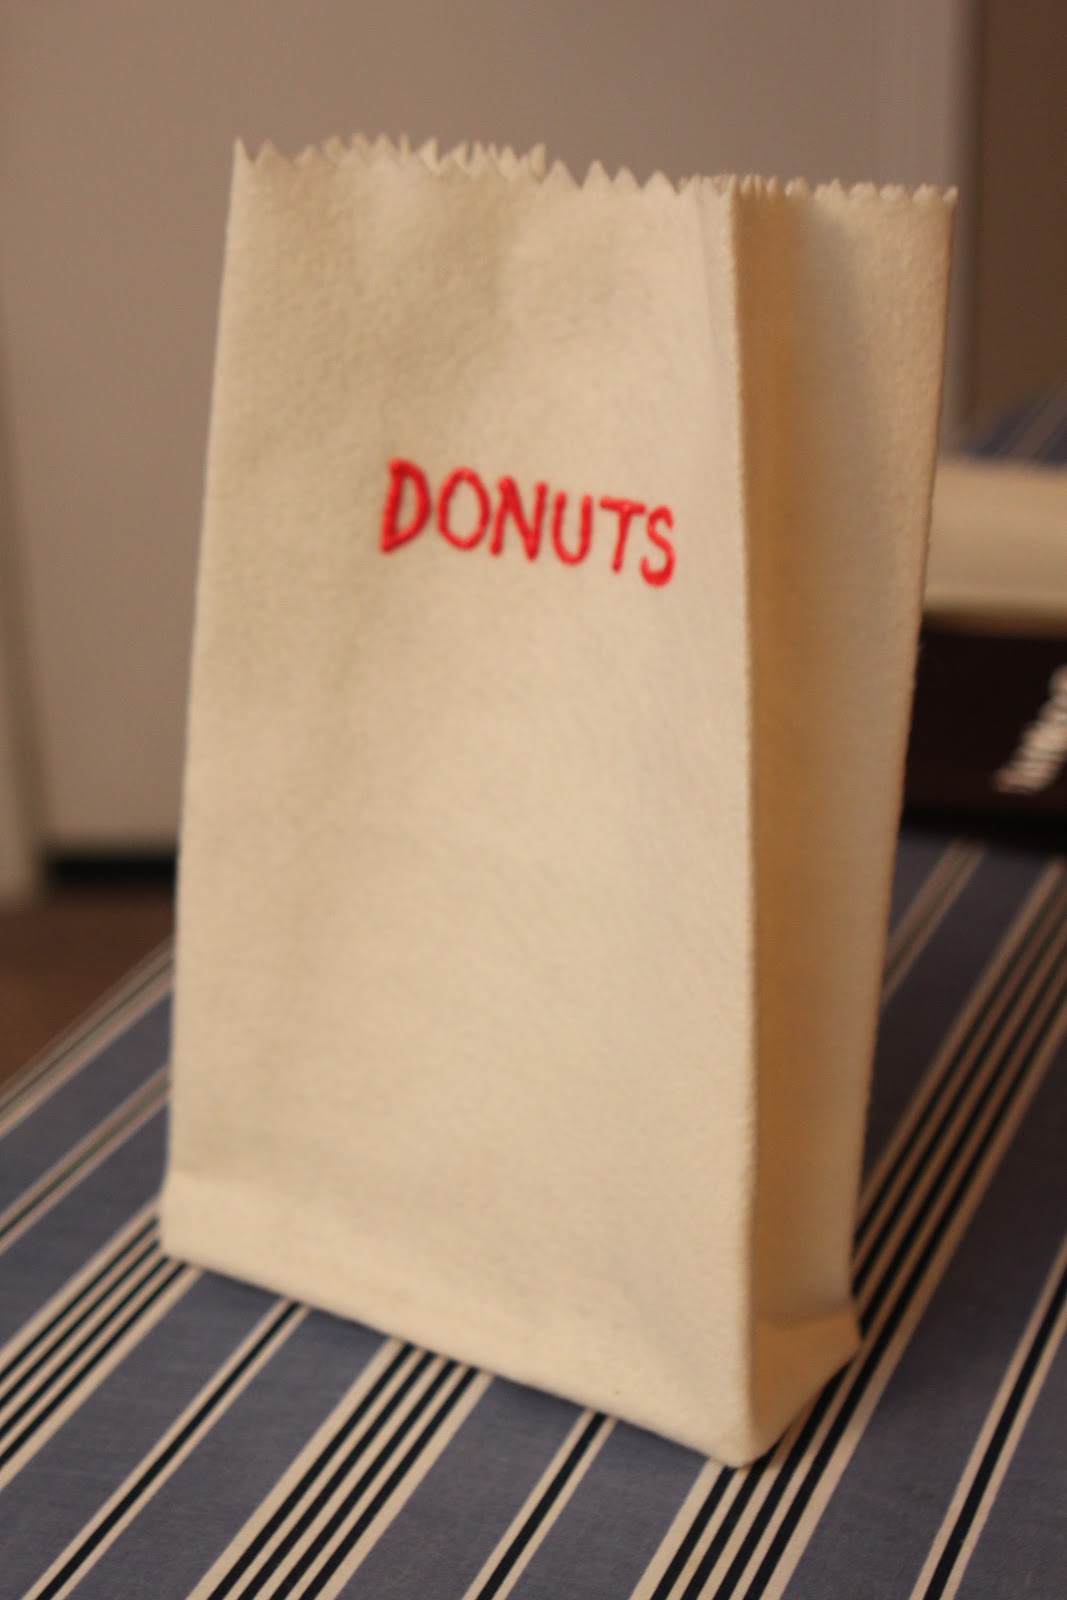
Now you have one awesome standing "paper" bag!


I added a sticky back velcro dot inside to keep the bag closed. 


And the finishing touch, writing donuts in puff paint! Gotta love puff paint!


Let all the paint dry laying flat for 24 hours. And then you can "package" up these fun little donuts!


The third bag I did tonight was the one I timed. Keeping in mind I'd had 2 practice runs before, and I was taking pictures at every step, this bag took me 30 minutes to create from start to finish. I was shocked it only took 30 minutes, I thought it would at least be an hour! And the donuts probably took about an hour to do a dozen. It was a lot easier project than I was expecting and I am darn proud of it! Think I'll add this book along with it and make it an even better gift!


Hope you enjoy making yours as much as I did! Thanks for reading my first ever craft tutorial!

: ) Lynly

Wednesday, November 16, 2011

OTRTOML, Pt. 3

From Felton's book,

"Others seek change as a desperate attempt to relieve the discomfort of disorganization and the pain of clutter. They're powerfully motivated to do what it takes to end the frustration they feel."

"Don't [annoy] yourself anymore. Tune in to your negative feelings, turn up the volume on them. Let them bubble to the surface and stay there. Zoom in on the "little" things that are diminishing the quality of your life. ... Let the irritation energize you. Let it propel you toward finding a solution that works."

"Disorganization is a problem of self-neglect. ... When we take care of ourselves, we take better care of those around us as well."

Powerful words to hear. Could easily say the same thing about weight loss. LOL

Monday, November 14, 2011

On the Road to Organizing My Life, Pt.2

I really should have thought of a shorter title for my little series here. Oh well.

I managed to clean out my pantry and rearranged my kitchen to work a little better for me. I forgot to take before pictures because I was so excited to get started! But here are some after pictures just because.

My "After" Pantry


Cookbooks were a new addition. Freed up a really big cabinet where these were previously.


My most exciting move was for my pots and pans and plasticware. P&P are now above my stove! They may be slightly too high (or more like I am slightly too short) but we think it's going to work out a lot better than where they were before. Yay for problem solving! (Please ignore my almond colored stove hood. Grotty.)


So that all went down last Thursday. Shout out to my super organized friend Jamie for supplying an extra set of eyes to see outside of my box, and bringing me Starbucks. 

Saturday I tackled Kynnedy's room. We've had a big pink rug in there since before she was born. It would always get bunched up and easily tripped on. I was done with that mess so I rolled it up and put it away. Well I'm still looking for a place to store it. Then I rehung the curtains in her room because they have been bugging me for over a year. Now they don't touch the floor and her window looks a lot bigger than it really is, as does the room without the pink carpet! I win!

After that I dived into our office / dog room. I hate this room. I'm sitting in it right now and my skin is crawling. I like my dogs sometimes, but they...they're....they're just gross. They shed and they fart and they're just gross. Needless to say I avoid this room as much as possible. However my amazing iMac is in this office / dog room and I hate when it sets neglected day after day. And I'm sure my husband does too. And I have these two amazing printers, one of which isn't usable because it's covered in papers to be filed. The other is usable but usually has to be cleared off before retrieving something. It's a sad, pathetic room, I tell you. And the walls are white...not a room I want to be in for long. When the next baby comes around I want to paint it green. Another day...

I was storing Kynnedy's bassinet in here, along with an elliptical from 1996 and some other big toy parts that are just awkward. I finally broke down the bassinet and placed the pieces in big trash bags to store in the shed. I'm sure I'll regret that decision when the next kid comes around. The clutter is at least less tall than it was which makes it look somewhat manageable. This one's gonna take awhile. I'm too ashamed for photos right now. But in the midst of writing this I've cleared off a good portion of the desk area. I win again!

My aunt gave me one of her books on organizing (her and my mom could probably start a library of organizational books). It's called Organizing Magic by Sandra Felton (www.messies.com). Apparently she's been around awhile, so I apologize if I sound like newbie to all this....so what if I am. If the rules can still apply today then we've got a classic here.


I've read thru day 2 (including the intro and how to use sections!) in like less than 30m, so that's saying something...EASY PEASY.

Now this is for my own reference, so don't judge me. This organizer lady says to write down 3 habits to stop doing, 3 to start and 3 to continue. Here are mine for my own reference and reminder.

STOP
1. Wasting time watching tv on Thursday's (my working from home day each week).
2. Stuffing things where they don't belong.
3. Putting off cleaning dishes.

START
1. Run dishwasher every night (been attempting this for the last few weeks, but not consciously).
2. Fold clothes as soon as they're done.
3. Do one load of laundry a day.
4. Take out trash when it's full.

CONTINUE
1. Crafting for therapy.
2. Cooking dinner.
3. Weeding out old clothes. 

Rereading these makes me think two things: 1. These are really simple, maybe even silly no brainers to someone else. 2. I can do these things. Organizing my life doesn't have to be hard. I don't have to invest a ton of money in the fancy organizational tools that may or may not help (and more likely add to the clutter). Baby steps, as with any task or goal. I'll take some cues from my almost 16 month old on how to train (or retrain) my thinking and habits by analyzing what I've been doing to see if it's as beneficial as it could be. And changing when I need to. 

Heaven forbid I don't want to end up on Hoarders! 

Wednesday, November 9, 2011

On the Road to Organizing My Life, Pt.1

It started with my laundry closet. The top of my dryer hasn't seen the light of day since we moved in 2 years ago.


I had been storing big appliances in their original boxes on the top shelf. But we weren't using them and they were taking up space. So I took them out and conserved a lot of space! That basket on the middle shelf holds my dish towels (I have 2 mini drawers in my kitchen). It sat on my dryer for 2 years. But no more! My crock pot is more easily accessible which is great because I've finally found the joy in using one! Notice my drip catcher hanging from my detergent dispenser. I'm pretty proud of that. And then hanging the grill tools was an a-ha moment. Wow...2 years it took me to do this. TWO YEARS. And my life changed on boring Sunday night. I'm sick of clutter!

Then came my desk at work. My coworkers were overjoyed at the sight.


My goal in organizing and decluttering is to create a space that is a safe haven, a sanctuary after a rough day, a refuge for my family and anyone who enters our home. I want to be able to find things, use things I have more easily, and make my home more efficient. I'm not fighting my home and it's messes...I'm fighting MYSELF and the messes I MAKE! How backward is that? So here's to no more angry rants at the cabinets, no more wondering what to make for dinner because I can't see anything in my pantry, no more giving up. My empty dryer top will be my inspiration and motivation. Because I can't tell you how excited I am to see that again.

Wednesday, September 21, 2011

14 months

Kynnedy, in just two months time, you've gone from baby to TODDLER! You look SO different! You're not a baby, that's for sure. You're definitely a toddler now! And sass to prove it. You love to jabber and talk and squeal. Love to give kisses and hugs. You even like to sing! You are a beautiful girl and I can't wait to find out what your special words mean!

2 weeks before her first birthday
Almost 14 months

Almost 14 months


Thursday, July 21, 2011

from 11 months onto 12!

Kyn, you started walking around June 20th! Right before Mommy went on a trip to Haiti, you decided to try out your legs. You were wobbly for a while, but you had fun. Daddy made everyone who saw you walking swear to secrecy until I got home to see it myself. The night before your first birthday, it clicked. You were walking confidently all over the house!

You decided veggie baby food was gross. But fruit was okay.

Dr. Bowen said you are a proportional, healthy one year old! You can eat whatever you want and you can have real milk too!

We celebrated your birthday at home with your grandparents. You got a cool Dora couch bed, first pair of Toms shoes, and lots of clothes and books. We're celebrating with all your friends on Saturday, July 23rd.

You enjoyed your birthday cake. You were pretty clean with it!

Your top two teeth came in at 11 months, and the next top two are beginning to peek through.

You love to feed yourself the big kid foods.

When you were a little baby, you used to shape your mouth into an "O" and it was so funny. You started doing that again, this time making the "ohhhh" noise when you do it. It is even more funny now! You normally do it when you see something new or exciting, or when you see someone you know.

You love giving kisses to everyone!

Kynnedy, you are a beautiful child. We love you more and more every day. You've loved us and tested us, and all of us are stronger because of you. You are our gift from God and we cherish every moment with you. You are the art I could never create and the picture I could never take.

Kynnedy at 11 months


First zoo trip


Kynnedy at 1 year